OVERVIEW
This preparation guide is intended to help you prepare for the Matrix Test. The Matrix Test
measures your ability to reason and identify patterns. You will be presented a 3 x 3 matrix
containing shapes that follow one or more patterns. The lower right cell of the matrix is
missing. You need to use the patterns in the rest of the matrix in order to decide which
answer choice belongs in the missing cell.
PRACTICE TEST
To help you prepare for the Matrix Test, here are five practice items
similar to those on the actual test. Read each question and determine which of the options
represents the correct answer. Once you are done with each question, look at the next page
and compare your answers to the answers and explanations that we have provided for you.
Although it may be tempting to check an answer before completing a question, you will
receive the most benefit from the practice situations if you answer the question first.
TEST TAKING TIPS
Before starting the practice Matrix Test, review these test taking tips:
- Review each question carefully before determining the correct response.
- Answer all questions even if you are unsure which option represents the correct answer. You are not penalized for incorrect responses.
- Finally, take time to study the explanation for each of the questions/answers very carefully. This will help you fine-tune your reasoning on the actual test.
Practice Item #1
In the item below, try to visualize the shape that would complete the matrix, based on the
pattern(s) of shapes.
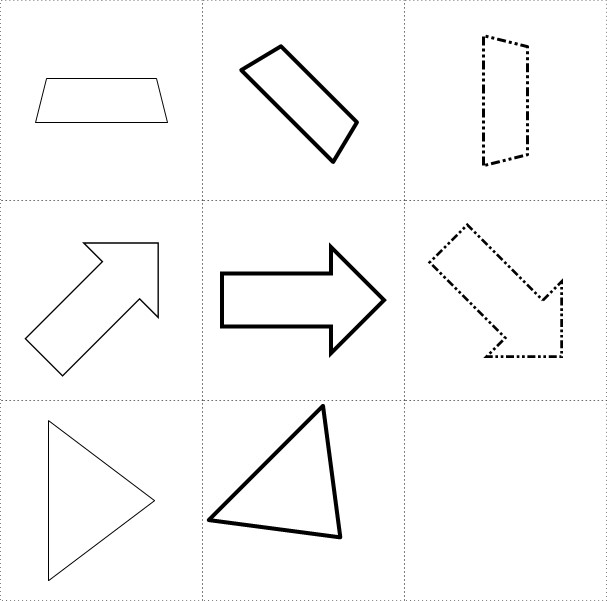
Select the option that best completes the matrix.
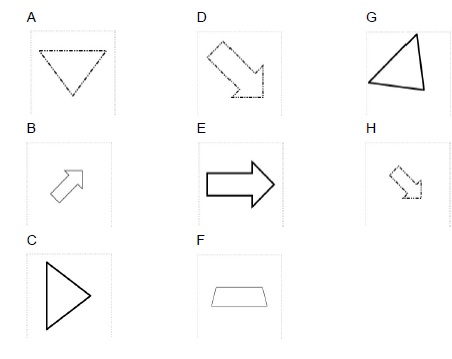
Practice Item #1 Explanation
There are three patterns in this matrix:
- In the first pattern, the shape changes across rows, from trapezoids in the top row, to
arrows in the middle row, to triangles in the bottom row. Therefore, the missing cell must
contain a triangle.
- In the second pattern, the line type changes across columns. The lines in the left
column are medium thickness, the lines in the middle column are bold, and the lines in the
right column are dotted. Therefore, the missing cell must have a shape with dotted lines.
- In the third pattern, the shapes rotate across columns. Moving from the left column to
the center column, the shapes rotate clockwise by 45 degrees (one eighth of a turn).
From the center column to the right column, the shapes rotate another 45 degrees.
Therefore, the shape in the missing cell must be rotated 45 degrees compared to the
shape that is in the middle column of the bottom row.
Putting these requirements together, the correct answer will be a triangle with dotted lines
that is rotated 45 degrees compared to the triangle that is in the middle column of the
bottom row. Option A is correct because it meets all of these requirements.
Practice Item #2
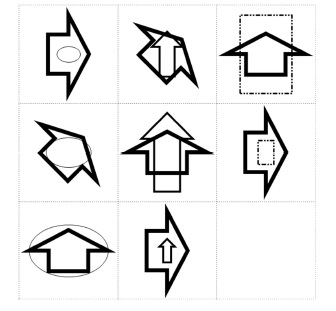
Select the option that best completes the matrix.
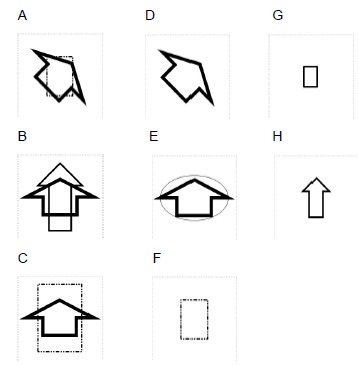
Practice Item #2 Explanation
There are two sets of shapes in this matrix. Each set has its own patterns.
The first set of shapes is the bold, wide arrow that appears in every cell.
- This shape has three orientations: pointing to the right, pointing up, and pointing to
the upper right. Each orientation appears exactly once in each row and each
column. The right column and the bottom row each already contain one bold, wide
arrow pointing up, and one that is pointing to the right. So, the missing cell must
contain a bold, wide arrow that is pointing to the upper right.
The second set of shapes has two patterns:
- First, the shape and line type change across columns, from ovals with thin lines
in the left column, to narrow arrows with medium lines in the middle column, to
rectangles with dotted lines in the right column. So, the missing cell must contain a
rectangle with dotted lines.
- Second, there are three different sizes of shapes in this set: small, medium, and
large. Each size appears exactly once in each row and once in each column.
The right column and the bottom row each contain one large shape and one small
shape. Therefore, the missing cell must contain a medium-sized shape.
Putting these requirements together, the correct answer must contain a bold, wide arrow
pointing to the upper right to complete the first set of shapes, as well as a medium-sized
rectangle with dotted lines to complete the second set of shapes. Therefore, Option A is
correct.
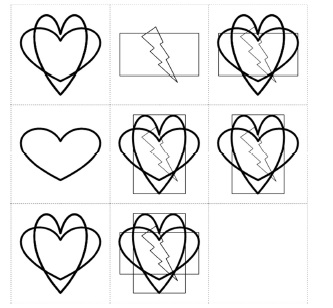
Practice Item #3
Select the option that best completes the matrix.
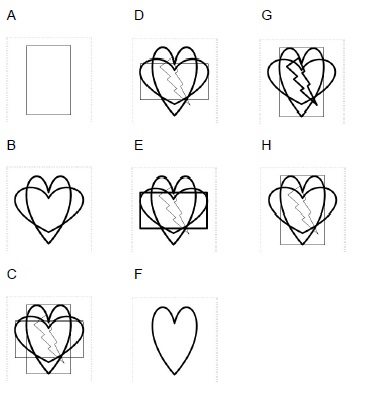
Practice Item #3 Explanation
This item is different from the example item and the first practice item. In this item, the
shapes in the right column are determined by combining the shapes in the left and
middle columns. In other words, the shapes in the right column are all of the shapes that
appear in the left column, plus all of the shapes that appear in the center column.
Look at the top row. The right column contains the two hearts that are in the left column,
and the rectangle and the lightning bolt that are in the center column.
Similarly, in the middle row, the heart in the left column is added to the shapes in the center
column. The right column contains all of these shapes. (The heart that is in the left column
overlaps with the same heart in the middle column, so they appear as a single shape in the
right column.)
In the bottom row, the two hearts in the left column are added to the five shapes in the
center column. Therefore, the missing cell must contain five shapes: the wide heart, the
narrow heart, the wide rectangle, the narrow rectangle, and the lightning bolt. Option C is
the correct answer because it contains all five of these shapes. (Just like in the middle row,
the two hearts that are in the left column completely overlap with the same two hearts in the
center column.)
Note that this pattern also holds vertically: The bottom row contains all of the shapes that
appear in the top row, plus all of the shapes that appear in the middle row.
Practice Item #4

Select the option that best completes the matrix.
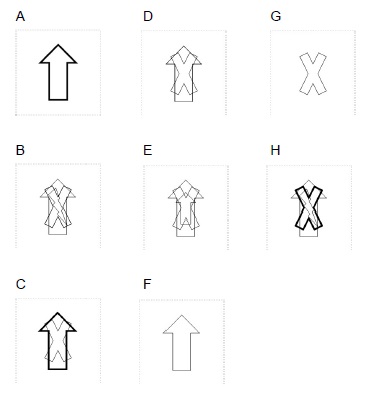
Practice Item #4 Explanation
In this item,
the shapes that are in the right column are the ones that are common to
both the left and center columns. In other words, the right column contains only the
shapes that appear in both the left column and the center column of the same row. Shapes
that are in only the left column or the center column do not appear in the right column.
Look at the top row. The X appears in both the left and center columns. However, the arrow
only appears in the left column and the lightning bolt only appears in the center column.
Therefore, the right column contains the X, but not the arrow or the lightning bolt.
Similarly, in the middle row, the X and the arrow appear in both the left and center columns,
but the lightning bolt is only in the left column. Therefore, the right column contains the X
and the arrow, but not the lightning bolt.
To decide what is in the missing cell, look at the two cells in the bottom row. Both contain an
X, so the missing cell should have an X. The arrow only appears in the left column, so it will
not be in the right column. So, the correct response is Option G, because it contains an X,
but not an arrow.
Note the pattern also holds vertically: The bottom row contains all of the shapes that appear
in both the top row and the middle row.
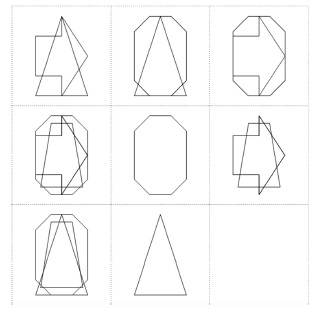
Practice Item #5
Select the option that best completes the matrix.
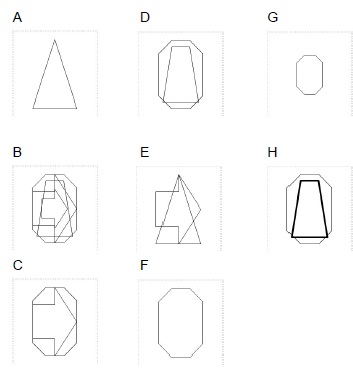
Practice Item #5 Explanation
In this item, the right column contains the shapes that are unique in the left and center
columns. In other words, the right column contains shapes that appear in either the left
column or the center column, but not the shapes that appear in both the left and center
columns.
Look at the top row. The same triangle appears in both the left and center columns, so it
does not appear in the right column. The arrow is only in the left column and the hexagon is
only in the center column. So, the right column contains the arrow and the hexagon.
Now look at the middle row. The hexagon appears in both the left and middle columns, so it
does not appear in the right column. The arrow and the trapezoid are unique to the left
column, so they appear in the right column. The middle column does not have any shapes
besides the hexagon, so it does not contribute any additional shapes to the right column.
In the bottom row, the triangle appears in both the left and center columns, so it will not
appear in the right column. The hexagon and the trapezoid are unique to the left column, so
they will appear in the right column. The middle column does not contain any other shapes,
so it does not contribute any additional shapes to the right column.
Option D is the correct answer, because it contains the trapezoid and the hexagon. Note
that Option H is not correct, because the trapezoid in Option H is not the same as the other
trapezoids (it has bold lines, and the type of line does not change in this item).
Note that this pattern also holds vertically: The bottom row contains all of the shapes that
appear in either the top row or the middle row, but not the shapes that appear in both the
top row and the middle row.
Do some online research to get additional practice